Hunter Digital Thermostat Upgrade
Article by Les Adams
There was a thread on another BBS by Alan Paskey about his installation of a Hunter Digital Thermostat for his A/C and heat. I have been wanting to do this for some time now and finally got around to going over to "Wally World" (Walmart) and buying the thermostat and installing it!
I installed it yesterday. Unfortunately, I have a Dometic (Duo-Therm) ducted A/C unit and Atwood furnace, and Alan Paskey's unit was a Coleman. His wiring documentation did not work for me. I spent the better part of the day figuring out how the Dometic contact closures worked and then another few hours doing the same for the digital thermostat and marrying the two together.
The digital thermostat is a Hunter (Part #42995) and is $19.95 at Walmart. The advantage of the digital thermostat is tighter hysteresis (±1 degree of temperature change yields "turn on" or "turn off"), a digital temperature readout, and no guesswork about where the temperature is set for your particular comfort zone.
The Hunter thermostat runs on 2 AA penlight batteries which are not supplied. I suggest carrying spares because if the batteries go dead, so does your thermostat (and both A/C and heat)!
The following documentation applies only to my particular Dometic-type A/C unit and Atwood furnace, although it should work on other similar Dometic systems and possibly other manufacturers as well. As previously mentioned, bear in mind that some wiring changes may be necessary to make the Hunter digital thermostat function properly with your system if it differs from the two referenced here.
Dometic / Atwood Wiring Conversion
| Original Duo-Therm OEM Function / Color | Hunter Stat Terminal |
|---|---|
| Ground (Black or Green) | RC |
| Fan (Orange or Tan) | G |
| Cool / Compressor (Yellow) | Y |
| Ground (Black or Green) | RH |
| Furnace (White) | W |
| High Fan (Blue) | Through SPST switch to "G" (Tan) |
| +7.5 VDC (Red) | Not used |
Hunter Thermostat Switch Settings: Set Heating System Selector switch to "HG" and "F/C" selector switch to "F".
Note that both the Hunter "RC" and "RH" terminals have the ground lead connected to them in this setup. I fashioned a jumper wire from one terminal to another—both of these terminals are grounded from the same point in my installation.
This setup worked very well for me. The Hunter thermostat has two fan positions ("Auto" and "ON") which enable you to run the fan only, if desired, in the A/C mode.
I used a RadioShack subminiature DPDT slide switch for the "High Fan" function. I cut out a small notch in the upper right-hand corner of the back of the Hunter thermostat and mounted the switch there with the supplied tiny screws (RadioShack part number 275-407). Actually, you only need an SPST switch, but any simple switch will work.

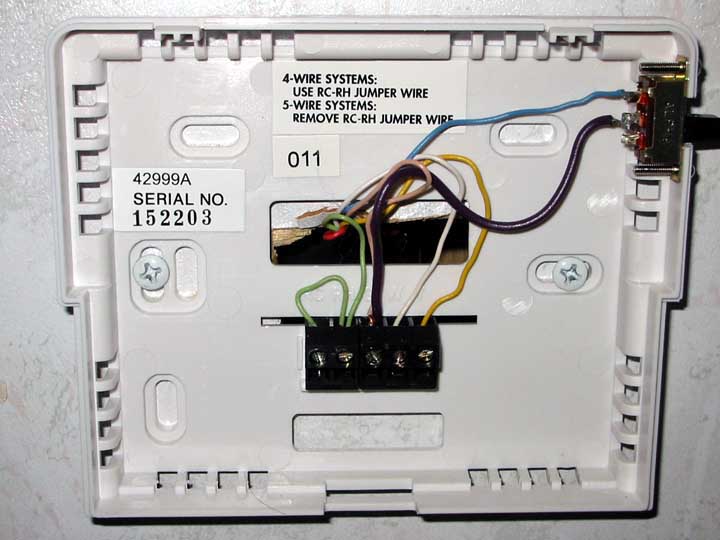
Additionally, I kept all of the standard thermostat leads (the OEM red wire is not used with the Hunter) just in case the Hunter ever fails and I have to switch back to the Duo-Therm. The original Duo-Therm thermostat can be reinstalled in just minutes if necessary.
For those with a Coleman setup, below is the original article written by Alan Paskey detailing his wiring layout.
Good luck and best regards,
Les
Hunter Digital Thermostat Follow-Up Report (Les Adams)
The Hunter digital thermostat was installed in my 27' Nomad travel trailer in the spring of 2001. We used the trailer all year long utilizing both the heating and cooling modes. The Hunter performed quite well, coming "on" at 1 degree above set point and going "off" at 1 degree below set point.
This is a great modification to make if you are dissatisfied with the hysteresis (on/off ratio) of your current thermostat. I find the digital much easier to use because you simply set the desired temperature, whereas with the OEM Duo-Therm analog thermostat, you had to adjust the temperature arm repeatedly to find a comfortable setting while trying to interpolate the small temperature marks.
Original Coleman Wiring Article (Alan Paskey)
Coleman A/C Unit Wires:
- Red: +12 VDC
- Blue: -12 VDC
- Green: Fan High
- Gray: Fan Low
- White: Furnace
- Yellow: Compressor
Hunter Terminal Connections (Coleman Setup):
| Hunter Terminal | Coleman Wire Color / Connection |
|---|---|
| RC | Red Wire (+12V) |
| RH | Red Wire (+12V) |
| G | To SPDT switch common (selects Green/Gray) |
| W | White Wire (Furnace) |
| Y | Yellow Wire (Compressor) |
Coleman Notes:
- I did not use the Blue wire (-12 VDC). The manual indicates it goes to all relay coils, but in this stat, it appears to be part of a compressor delay circuit.
- I ran a wire from "G" on the stat to the common terminal of a single-pole double-throw (SPDT) switch. I wired the Fan High (Green) and Fan Low (Gray) wires to the switch outputs. This allows manual control of high and low fan speeds.
- Total cost: $19.99 for the thermostat from Walmart and $2.99 for the switch from RadioShack.
See also:
- The RV Furnace – Return air airflow restrictions and safety warnings.
- Troubleshooting the RV DSI Furnace – Diagnosing DSI ignition boards, sail switches, and relays.